It's actually the name of a British mathematician/philosopher who came up with a system of logic to manipulate sets of numbers. Since the "objects" we deal with in the world of 3D modeling are nothing but numbers, truth to tell, we're studying the creation of "Boolean" objects. We're also learning to create terrain and randomize objects, like trees, in that terrain. That was the theory, anyhow.
First, I wanted to do was a replica of Devil's Tower in Wyoming complete with trees. This would cover 2 out of three requirements for this assignment. I would then use Boolean shapes to create a giant spaceship a-la "Close Encounters". Alas. While I figured out how to make the terrain just fine, everything else proved more difficult.
 | ||||
| This means something. |
Next, I used a cylinder and a cone to create a pine tree. I introduced some noise into the cone to make it less uniform and added an evergreen bump map. Probably a waste of time, since that level of detail will likely be too small to see. I grouped the trunk and cone together to make one object. Anyway, here's what it looked like.
 |
| A happy tree. |
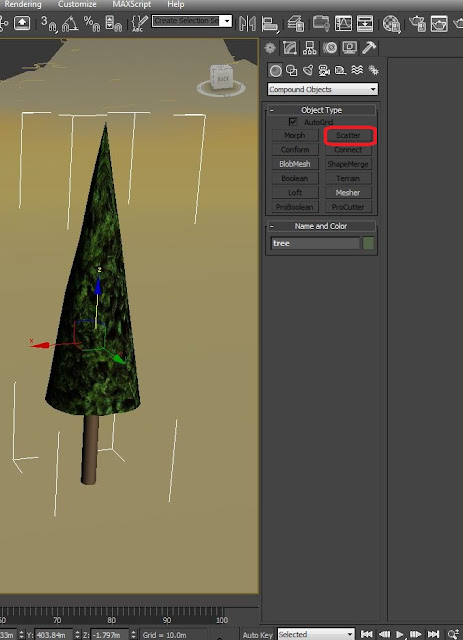
I wanted to use the scatter operation in the "Compound Objects" box. No such luck. You see, every instruction I read in my class notes, online, in the QuickStart guide, and in the Help files said to select your object, select "Scatter" and you're off and running.
I've circled the "Scattter" button in red just to make sure you understand my problem here, dear reader. I was being told to use a tool that I couldn't even open. Eventually, I did something I'm loathe to ever do for any reason. I gave up. At least I demonstrated that I can create terrain. I would probably be able to put things on it, too, but I can't figure out how to use the bloody tool.
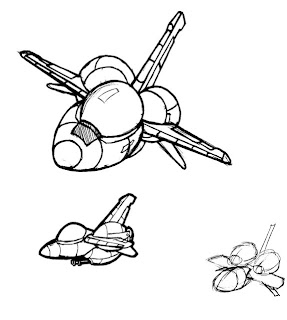
Next I decided to use Boolean operations to create a much smaller spaceship. I drew this one at work awhile back:
It was a cute, round, chibi little fighter plane and I, correctly, guessed that it would be a good candidate for Boolean object creation.
Here you see the fuselage, in pink. I used a "capsule" shape out of "Extended Primitives" for that. The blue engine nacelle was a sphere that I made into an editable poly and stretched into the egg shape I needed. I used that purple cylinder you see behind the nacelle as a sort of "cookie cutter" to open the hole in the back for the rocket nozzle.
It's kind of embarrassing that this took me several hours of work. In the game industry, a little ship like that could probably be put together in less than one hour. The wings and tail were surprisingly difficult. I could have left the edges rectangular, but I wanted a more rounded wing shape. The wings, tail, and stabilators required several modify commands stacked one on another. Again, I'm sure there's a simpler way that I'll learn sometime in the future. The sun was up by this point and I was rushing to get my "bubble fighter" textured, lit, rendered, and uploaded to my blog before class. I didn't make it, but at least the ship was done.
For my ship I really wanted an air-superiority gray paint scheme like you see on U.S. Air Force planes. With no time for PhotoShop work, I tried to knock something out in Painter. Microsoft Painter, to an artist, is like having a cocktail napkin and one broken crayon to draw with. Serviceable, but that's about it. I then tried wrapping the new texture around the fighter. I fought and fought but couldn't get the dark gray nose, black non-glare panel in front of the canopy, and the mottled gray back of the plane to work out right. On the flipside, I was getting some interesting patterns that I didn't expect. This might be useful for camo paint schemes in later projects. I did a version of my air-superiority file with red in it to see how it would look. One of my attempts at texturing gave me a really nifty pattern. Sort of a Red Baron of the future.
I used the same UVW settings with the original gray colors for a less exciting, but more military look.
 |
| We're off to outer space |
A picture of Earth from orbit, mapped onto a simple plane and lit with a spotlight and an omni light (to simulate reflected light from the planet) are what sells it, I think. (Fun fact: NASA space photos are all public domain.) Eventually, I'd like to be able to have the exact paint pattern I want with squadron markings, and lines to show panels, control surfaces, and other greebles. As an aside, I suddenly realized that, for the image below, when I moved the ship for a better rendering angle, I forgot to move my "planet" fill light. The underside of the ship is a little darker than it should be. Ah, well. Live and learn.
 |
| We're leaving Mother Earth |
I stuck a couple of spotlights into the bell of each rocket engine and gave the lights a blue atmospheric effect to simulate exhaust. With more time I might experiment with lens effects to better display the engines' power.
 |
| To save the Human race, OUR STAR BLAZERRRRRRRS! |
And that's it. My bubble fighter isn't going to win many coolness contests up against X-wings and Vipers, but for my first 3D vehicle, I think I did OK. Now I just need a decent call-sign and my adorable little war machine and I will be ready to start our near-space patrols.
See you, space cowboy.


