It is currently 8:30 in the morning and I have been up since, about 9:30am yesterday morning. hooray... I'll probably have time for a 2 1/2 or 3 hour nap before I have to go to class. After that it's caffeine and sheer stubbornness to keep me alert until I can come home and crash. It was fortunate for me that class was canceled last week, giving me an extra week to do stuff one of my classmates did in about six hours. Before I get to showing off, though, I want to express my most sincere thanks to my friend Otter. (Legal name's "Katie" but no one calls her that.) She took about six hours out of her Friday to come over and personally help me with my project difficulties. Things progressed noticeably faster after that. I never would've finished without her help so, thanks Otter!
Okay. Anyone reading this may recall the initial look of the Ammo Room as it was assigned to us by Professor Ben.
Mmkay! Pretty basic shapes all sitting there with the colors 3DS Max assigned them when they were created. This wild color scheme helps to identify which object is which, especially if they're clumped together to create bigger objects.
This is what some unfortunate soul would see upon knocking at the door of this personal bomb bunker. Upon stepping into the room the visitor may began to question the life choices which led him/her to this point.
 | ||
| This place is Talibantastic! |
 |
| "Please close the door behind you. We wouldn't want anyone... unsavory wandering in." |
And about that table...
I didn't quite have time to fiddle with the wood texture on the legs. I wanted it to go vertical, the way I managed it on the stool. Oh, well. Maybe next time. I managed to fix the weird way 3DS Max was mapping the stones to the wall with the window. I had it map to the room as a box. I'm writing this down, because I expect to forget it completely in a day or two.
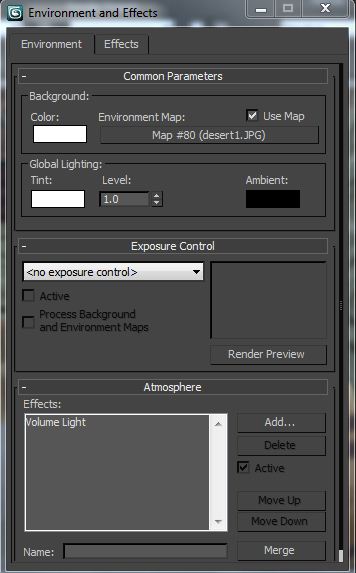
You may have noticed the a bit of desert outside the windows. There's some visible outside the door, too. I just raised a flat plane, duplicated it, and put one in front of the door, and one in front of the window like a big movie screen. Then I just put my desert scene on that plane. I had the devil's own time getting the scene out the window to render though. The windows just showed pitch black for over half an hour before I stumbled upon a setting in one of the Render window thingees. "Render Iterative" I think it was, but don't quote me on that.
Wasn't until I changed the background color from it's default black to white, that I got the desert image to show up. Using the Help files to type "render objects outside window" or "render objects outside scene" was absolutely no help. Neither was the QuickStart Guide. I just had to stumble on it.
And since I mentioned iterative rendering, Otter advised me to get into the habit of iterative saves. i.e. don't just save the project your working on under it's own name. Every once in awhile do a "Save As" and save a version under a slightly different name (like adding 1, 2, 3, etc.) That way if (when) something screws up in a way that's unrecoverable, you've made a save point that will keep you from having to start over from the beginning. But back to the project.
Most of my textures were lifted straight out of the 3DS Max materials library. There's some good stuff in there. http://www.morguefile.com is also a huge database of copyright-free images available for free download. It's awesome.
I also spent a couple hours in Photoshop building crates and barrels that I liked. Basically I got a copyright free picture of a wooden fence, this one from http://www.photos-public-domain.com. I then got a pic of rusty steel from the MorgueFile and made used the rectangular marquis tool to cut it into strips and put each strip on it's own layer.
 |
| Because combining alcohol with high-explosives never goes wrong for anyone. |
I made a top to the barrels, but I couldn't figure out how to isolate the pixels on the top of the barrel 3DS Max object. I just wrapped the the texture around the editable poly object as a cylinder and the program did the rest. Easy, for a change. I made square selections from the fence to create the sides of the boxes. I selected individual boards to create the boards bordering the boxes and then just slapped some text on them at 50% opacity to make it look cheaply painted on, just like with the barrels. I played with the levels Photoshop to darken some of the wood and make it look aged. I really should've gone farther with the aging.
 | |
| And there's also no way this could ever end badly for all involved, right? |
Who is that dashing rogue? Oh, I do hope some hot brunette policewoman manages to apprehend him before he can break any more hearts!
In conclusion, if I can get a little more face-to-face tutoring I should be able to keep up with the pace of instruction in this class. I heard a rumor that there's actually some kind of 3DS Max tutoring available at school. I'm going to investigate this next week. First, though, class and then sleep.


No comments:
Post a Comment