Saturday, June 25, 2011

Game Asset Pillar: UV Unwrap Part II

Okee-doke!  We're still working on unwrapping UVWs, manipulating them in an image editing software (read: Photoshop), bringing the newly edited piece back into 3DStudio Max, and applying this beautiful new texture to our object.  This week, the professor gave us a simpler object than a human figure with folds and bends in his clothing.  To get us started he gave us the type of object we might see as a game asset.  He called it an Avatar Pillar.  It's dirt-simple, yet kind of awesome-looking at the same time.

Pretty cool, right?


This kind of pillar is the sort of thing players might use during a game to gain power-ups or something like that.  Since they're going to be right up on it, we should make it look extra nice.  We got some more instruction on how to put textures on an object, go into the "Edit UVWs" window to flatten the verts and edges into a wireframe, and then use "Render To Texture" to get our flat piece of artwork.  Using the default materials (rusted metal on the ankh and stone on the base) I got a basic flat texture to export into Photoshop.


The program tries to be helpful by adding in shadows to your new diffuse map.  Looks awful.  No problem, though, that's what we've got Photoshop for.  Since I've got Photoshop (PS) on my Mac and 3DS Max is on my fiancee's Windows box, I have to send the file over to the Mac.  After using the Alpha channel to remove all the colored portions of the image I was ready to begin finding, massaging, and placing my chosen textures on the diffuse map.  The prof said he'd like us to have 4 distinct renders of this Avatar Pillar, representing earth, air, fire, and water.  Cool!  A few hours PS work and I had my four diffuse maps.  The Earth map looked like this:

I can fix that seam on the base later and re-import it, I suppose
I used a regular white and gray marble for my base.  I was then able to use the adjustment tool in PS to change the color to suit each element: green for earth, yellow for air, red for fire, blue for water.  These are the same colors that many neoPagans use for candles in their ceremonies.  (You never know when random trivia will come in handy.)  For the earth, I even made a second map with the marble base texture removed and the stone of the ankh desaturated to black and white so I could use it as a bump map.  So far so good.  Then all I had to do was assign the diffuse map to each slot in my material editor (ankh and base), assign the bump map to a third material editor slot, apply them to the image and then I could...


What the...  That didn't look right at all!  The textures were much too small and left blank gray areas visible on the object!  Maybe if I tried it again I'd figure out what went wrong.


No, that didn't work.


Ah, come on!

YOU GOTTA BE $#!**!# ME!

Ten hours of work and this is what I end up with?!  Really?  This is the tough guy assignment all over again.  I did everything I was supposed to do.  I made sure the "render to texture" was 1024x1024.  I thought that was supposed to ensure that it fit exactly the same way the original "rendered to texture" diffuse map did before I dragged it into Photoshop.  What changed?  I don't know.

It's less than four hours until class, I'm tired, angry, and confused.  I'm sure there's some tiny obscure detail that I'm missing that's causing this mess, just like everything else in 3DS Max.  I've gotta get behind the wheel of a car in about three hours and I can't think clearly.  I think I'll just take a nap and bring everything with me to class so I can see what I did wrong.  Oh, and there's a midterm on this stuff in 3 and a half hours, too.  Yay!

Friday, June 17, 2011

Surfacing the professor's Tough Guy

The professor dove into the meat of the class last week.  He spent the class explaining unwrapping UVWs.  He also explained and demonstrated pelt mapping, just to show us how it works.  It doesn't seem to have any real advantages over mapping in a planar, cylindrical, spherical, etc. way.  This lesson was super-complicated.  I was following him through, about, the first half of the class.  After that I started to fall behind.  Once I started that downward slide it accelerated throughout the rest of the class.  By the time we were ready to leave I was totally lost.

Uh oh.
So, we got a model of a guy in a jacket and jeans.  We also got a JPEG of the guy's outfit and face all flattened out.  So far so good.  As I understand the process, we are to take each part of the model, display it's planar faces in the "Edit UVWs" window.

Something like this.
We then clean up the vertices and edges and make them, somewhat, fit the flattened out pictures of each item.  At this point my brain says, "a wizard walks into the room, waves a wand, and the images are properly wrapped around the model."  I say that because that's as far as my understanding of the subject has gotten.

Take a look at the "Edit UVWs" window on the right half of the screenshot below.  The irregular green box with the hole in the top is the flattened representation of the body of the model's jacket.  The picture of the model on the right shows a patchwork of the flattened out JPEG as it actually mapped onto the jacket.  What a horrid mess!!


It's worth noting here that, before I made this screenshot, I had gotten the jeans in the "Edit UVWs" window to match the JPEG image of the jeans.  Look at the leg of the model.  Another patchwork disaster.  What happened?  I don't know.


I collapsed the modifer stack, hoping that I could just hold onto what I'd done and start working on another piece of the model.  Maybe I'd have more luck with the jacket sleeve.  Collapsing that stack seemed to completely reset the "Edit UVWs" window.  All that work I did on the verts and edges for the jeans and jacket.  Lost!
And the mapping on the model is still a trainwreck.

I then went right into selecting all the faces on the sleeve.  I applied the UVW Modifier to the stack on top of "Unwrap UVW" which, itself, was on top of "Editable Poly".  Under "Parameters" I made the mapping "Cylindrical".  As I adjusted the size of the cylinder, I noticed that the map on the rest of the model was changing.  I hadn't even selected the rest of the model.  Why was it changing.  I don't know.
What the frak?


The "Edit UVWs" window for that step looks like so.


I can't seem to figure this stuff out no matter how hard I fight.  There are so many details he went over in class and I couldn't write fast enough to get them into my notes.  I tried reading the Help file's chapter on the UVWs Modifier.  It told me about the fantastical, magical things this tool can do but didn't give enough of the step-by-step visual instructions a right-brained artist like myself needs to figure out how to make it do these things.  To top it off, when it seems like I'm starting off correctly, the program throws away half an hour of work without even explaining why.

I don't know what to do, and class is only nine hours away.

New Class, New Challenges

This summer semester I'm taking 3D Lighting and Surfacing 1.  We learned to make basic models in the previous class (3D Modeling 1).  We now need to learn how to cover them in textures that make them look real and light them realistically as well.  I did some of this in the previous class.  This semester's class specializes in that.

Remember that Ammo Room from last class?  We used it again for this one.  This first class assignment I just used the basic shapes as a way to show how my lights would bounce around objects in a scene.  For this I used the basic gray objects instead of the textured objects from last class.  We were asked to use lighting to create 4 different atmospheres or moods.


This first one was just a basic yellowish light with shadows turned on.  I left the windows dark outside.  You can see how the stark single light casts shadows from objects in the room.  That's not all I had to do, though.  You see, these objects don't bounce light off themselves the way things in the real world do.  The overhead lamp was a directional spotlight placed in the same location as the bulb.  I then put an omni at the floor level, the same color as the overhead light to simulate that light bouncing off a white concrete floor.   There's another weak omni light hovering at ceiling level to fill the room a bit more.


The next one was almost the same except I changed the color of the light to red.  I think this turns the Ammo Room into a sort of darkroom.  Whoever works in here is either developing photographic film, or he's going out immediately into the night and he doesn't want to compromise his night vision.  The light bouncing off the floor is red but the shadows are slightly bluish.


This next one is an afternoon scene.  I accidentally made the lamp shade slightly transparent, but that's fine.  I added a yellow-orange directional light outside the window to simulate a sunset.  I also placed a plane outside the window with a desert sky simulating that sunset.  For some reason the map didn't render.  you see the reflection of the sunset on the boxes in the room but not the light out the window.  Frustrating.  I also added a faint omni light just in front of that box.  It's the same color as the sunset light and you can see it reflecting off the barrel next to the box.


Fourth one was meant to be an underwater scene.  To enhance that feeling I made the lamp shine a kind of washed out teal color.  The directional light from outside was changed from sunset orange to underwater blue.  Again, there was supposed to be a plane with the underwater seascape but it didn't render.

This was a decent exercise for helping us think about how light bounces around in the world and what reflected light does from object to object.

Saturday, May 21, 2011

Anakin's gauntlet

Our final project in 3D Modeling and Rendering was to model a human hand.  The hand is one of the most difficult things to draw with pen and paper.  Modeling it in a 3D program is just as difficult.  It's actually much more time consuming.  The teacher gave us leeway to make any kind of hand we wanted.  It could be a detailed human hand, a scary monster hand, a robot hand, whatever.  We just had to use the techniques laid out in the online lesson to make it "come to life".  I decided to make a detailed glove.  Specifically the glove that Anakin Skywalker used to cover his prosthetic hand.

\ 
I tried to include seams on the glove and make sure the straps around the forearm were sharp.  I then tried putting it in an appropriate setting with appropriate lighting.  I couldn't get the lighting quite right, though.  Fortunately, my next class is 3D Lighting and Surfacing.


I have a light source coming from the city in front of the room where the sun is setting over Coruscant.  I tried turning on shadows but I got no shadows from the table or the columns.  None.


I tried to create a chrome texture for the lightsaber.  It seems to be reflecting the wood of the table but I'm not sure it's coming across well.  The table reflection is making part of the saber near the black grips look invisible.  Again, no shadows from the lightsaber or the glove.  I don't know why.


Now here's something kind of odd.  Why is the inside of the glove transparent?  I see the wood grain of the table through it.  Again, not that the chrome cap at the end of the lightsaber is so reflective as to appear transparent.  Again, no shadows.  Not sure why but it was the last assignment of the class.  I'll have to get some more help elsewhere to figure this baffling lighting problem out.  I will, eventually figure it out, though.

Ciao!

Flying Ship

My professor figured out what went wrong with the render on my flying ship.  I had, inadvertantly, put a displacement map onto some of the metal surfaces.  As soon as I removed that, my renders worked a lot better.  I put a photograph of the Pleiades behind it and lit the model.  First in a dramatic silhouette.


And then with a lot more fill lighing.


Not bad for a beginner, I suppose.

Tuesday, April 19, 2011

Group project

It's been awhile since I posted but, here goes.

My introductory 3D Modeling class is working on a group project.  We're building a little island outpost.  The aesthetic will be a mix of feudal Japanese (think Edo Period) and high tech.  It's intended to be a little run down near the docks but there will be a Japanese style castle at the top where the island's rulers live.  Everyone was initially assigned different materials to contribute to our material bank and an object which will be scattered around the scene.  I drew canvas as my material and sacks as the object.  I figured they'd be big sacks like one would see for potatoes or coffee.  I put a simple burlap texture on them.


There's a purple blob in the sack that someone can use to add the texture of the contents.


So far, so good.

Next, we had assets to build.  Streetlights, cafe's, the castle, things like that.  I got assigned an airship to be floating above the harbor.  I decided to build it like a boat but with sci-fi elements.  I used simple box-modeling to create my boat.


 It took a day and a night to get this done.  Overall, though, I think it turned out pretty well.  My professor showed me a way to make the shape a bit less smoothed.  I really wanted some sharper angles above the waterline.  When I got home and tried it, though, I was unable to find the buttons that let me control that.  Still, the whole thing came in at less than 1200 polys!  Our budget was 3000, So I could have gone into even more detail.

The anchors were a pretty involved box-model


The engine


I hadn't realized it would look so much like the ship from Disney's "Treasure Planet".  WHOOPS!

Next, I had to texture the boat.  In keeping with the assignment, I chose textures provided by my classmates.  Different colored woods, 2 types of metal, solar panels, and a corrugated tin roof texture.  I tried to mix different wood textures on different polygons on the hull to give it an old and frequently patched look.


The darker wood on the hull didn't work as distinct panels.  It all tried to map as one continuous texture.  Never figured out how to change that.  When I added individual panels of dark wood, it just mapped to match the rest of the panels.

 I added a simple dark gray color that wasn't in our bank of provided textures for the engine nozzle and struts connecting it to the hull.  It came out as one gray blob in the screenshot.  It will probably be better defined after lighting is added to the scene.


The deck is a little too far below the side railings in comparison to the scale of the ship.  The thing is supposed to be about 60-65 meters long.  I used the old sailing ship U.S.S. Constitution (Old Ironsides) as my reference for scale.  I meant it to be a small freighter, but it looks like it could be a fishing vessel, too.  I named her the Seion Maru.  "Seion" is a Japanese word meaning "serenity".  A nod to the Firefly Class Transport ship Serenity from the unjustly canceled TV show Firefly.  "Maru" is an old Japanese ship naming convention.  It means "circle" as in circle of protection.  It's a word often tacked on to the end of the names of civilian Japanese ships and boats.

I was running out of time to get to class, so I gave up trying to get my textures exactly the way I wanted and just decided to render.  The render, however, didn't work at all.  The images you see above are all screenshots.  Here are the renders.  No lighting, though.  Just simple, basic renders.

WHAT THE...


What a disaster!


I have absolutely no idea what happened here.  I'm going to email my professor to see if he can shed some light on the problem.  In the meantime I uploaded both the textured and untextured versions of my ship to the shared file the class is using.  We'll see if this mess is fixable.

Saturday, March 26, 2011

Booleans!

I know.  That word sounds like an expletive.

It's actually the name of a British mathematician/philosopher who came up with a system of logic to manipulate sets of numbers.  Since the "objects" we deal with in the world of 3D modeling are nothing but numbers, truth to tell, we're studying the creation of "Boolean" objects.  We're also learning to create terrain and randomize objects, like trees, in that terrain.  That was the theory, anyhow.

First, I wanted to do was a replica of Devil's Tower in Wyoming complete with trees.  This would cover 2 out of three requirements for this assignment.  I would then use Boolean shapes to create a giant spaceship a-la "Close Encounters".  Alas.  While I figured out how to make the terrain just fine, everything else proved more difficult.

This means something.


I immediately ran into a problem.  Any time I created terrain and clicked away to look at, or work with something else, that nifty window full of parameters for "Terrain" dissapeared.  In the screenshot you'll note the button for "Terrain" is grayed out.  I had to do everything with the terrain right then and there because I couldn't figure out how to get the tools back.  The books and Help files were, predictably, useless.  While the tools were available, I tried for over an hour to figure out how to add different gradations of color to different elevations.  I finally stumbled upon a setting where 3DS Max puts in default colors for you.  I was able to change these colors to something close to what I wanted.

Next, I used a cylinder and a cone to create a pine tree.  I introduced some noise into the cone to make it less uniform and added an evergreen bump map.  Probably a waste of time, since that level of detail will likely be too small to see. I grouped the trunk and cone together to make one object. Anyway, here's what it looked like.

A happy tree.

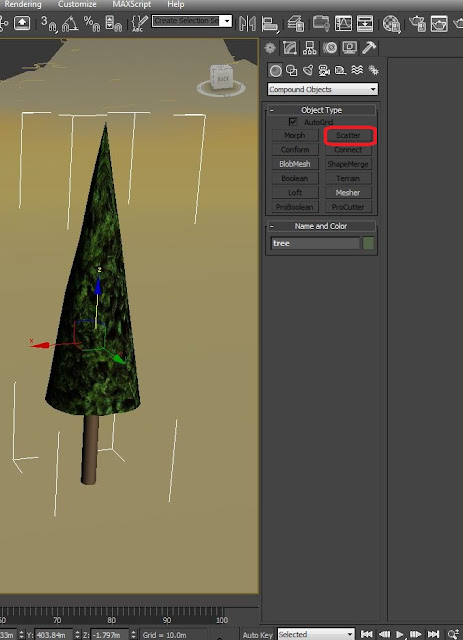
I wanted to use the scatter operation in the "Compound Objects" box.  No such luck.  You see, every instruction I read in my class notes, online, in the QuickStart guide, and in the Help files said to select your object, select "Scatter" and you're off and running.


I've circled the "Scattter" button in red just to make sure you understand my problem here, dear reader.  I was being told to use a tool that I couldn't even open.  Eventually, I did something I'm loathe to ever do for any reason.  I gave up.  At least I demonstrated that I can create terrain.  I would probably be able to put things on it, too, but I can't figure out how to use the bloody tool.

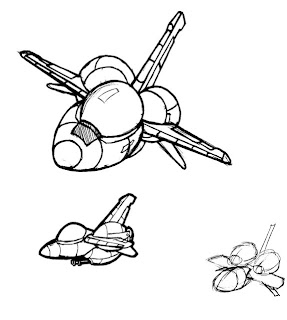
Next I decided to use Boolean operations to create a much smaller spaceship.  I drew this one at work awhile back:

It was a cute, round, chibi little fighter plane and I, correctly, guessed that it would be a good candidate for Boolean object creation.


Here you see the fuselage, in pink.  I used a "capsule" shape out of "Extended Primitives" for that.  The blue engine nacelle was a sphere that I made into an editable poly and stretched into the egg shape I needed.  I used that purple cylinder you see behind the nacelle as a sort of "cookie cutter" to open the hole in the back for the rocket nozzle.

  
It's kind of embarrassing that this took me several hours of work.  In the game industry, a little ship like that could probably be put together in less than one hour.  The wings and tail were surprisingly difficult.  I could have left the edges rectangular, but I wanted a more rounded wing shape.  The wings, tail, and stabilators required several modify commands stacked one on another.  Again, I'm sure there's a simpler way that I'll learn sometime in the future.  The sun was up by this point and I was rushing to get my "bubble fighter" textured, lit, rendered, and uploaded to my blog before class.  I didn't make it, but at least the ship was done.

For my ship I really wanted an air-superiority gray paint scheme like you see on U.S. Air Force planes.  With no time for PhotoShop work, I tried to knock something out in Painter.  Microsoft Painter, to an artist, is like having a cocktail napkin and one broken crayon to draw with.  Serviceable, but that's about it.  I then tried wrapping the new texture around the fighter.  I fought and fought but couldn't get the dark gray nose, black non-glare panel in front of the canopy, and the mottled gray back of the plane to work out right.  On the flipside, I was getting some interesting patterns that I didn't expect.  This might be useful for camo paint schemes in later projects.   I did a version of my air-superiority file with red in it to see how it would look.  One of my attempts at texturing gave me a really nifty pattern.  Sort of a Red Baron of the future.


I used the same UVW settings with the original gray colors for a less exciting, but more military look.

We're off to outer space

A picture of Earth from orbit, mapped onto a simple plane and lit with a spotlight and an omni light (to simulate reflected light from the planet) are what sells it, I think.  (Fun fact: NASA space photos are all public domain.)  Eventually, I'd like to be able to have the exact paint pattern I want with squadron markings, and lines to show panels, control surfaces, and other greebles.  As an aside, I suddenly realized that, for the image below, when I moved the ship for a better rendering angle, I forgot to move my "planet" fill light.  The underside of the ship is a little darker than it should be.  Ah, well.  Live and learn.

We're leaving Mother Earth

I stuck a couple of spotlights into the bell of each rocket engine and gave the lights a blue atmospheric effect to simulate exhaust.  With more time I might experiment with lens effects to better display the engines' power.

To save the Human race, OUR STAR BLAZERRRRRRRS!

And that's it.  My bubble fighter isn't going to win many coolness contests up against X-wings and Vipers, but for my first 3D vehicle, I think I did OK.  Now I just need a decent call-sign and my adorable little war machine and I will be ready to start our near-space patrols.

See you, space cowboy.